Today, we touch a little on view pages and the main index.js located at the root folder. By default, index.js represent the beginning of the first view.
The default script for index.js looks like this…
var ready = require('enyo/ready');

ready(function() {
	console.log("Hello World");
});
Enyo ready is basically, a simple module that triggers a function when the document DOM is ready. Similar to jQuery onready. Once the first page body is loaded the entire enyo will start taking over.

Let’s give it a proper App declaration and render the first page into document.body
You may remove all the index.js content. Go all the way to the top of the code of index.js add these 3 lines. For more details of what classes role and what they do refer to enyojs documentation online.
/* This is how we import classes from enyo library CommonJS Style */
var ready = require('enyo/ready');
var kind = require('enyo/kind');
var control = require('enyo/Control');
Next, we declare variable App.
var ready = require('enyo/ready');
var kind = require('enyo/kind');
var control = require('enyo/Control');

/* We then include one of our ViewPage as the first page to display. In this case we will
later create a viewpage file FirstPage which is stored inside my src/viewpages folder */

var FirstPage= require('./src/viewpages/FirstPage');

var App = control.kind({
	classes: 'enyo-fit',
	components: [
		{ kind: FirstPage }
	]
});
Next, we render App into document.body once the html body DOM is ready.
var ready = require('enyo/ready');
var kind = require('enyo/kind');
var control = require('enyo/Control');
var FirstPage = require('./src/viewpages/FirstPage');

var App = control.kind({
	classes: 'enyo-fit',
	components: [
		{ kind: FirstPage }
	]
});
ready(function() {
    /* As usual App is a kind class, instantiate it and use the enyo function
       "renderInto the document body of the html page" */
    new App().renderInto(document.body);
});
/* Code above, will not compile correctly without FirstPage */
You might want to save code above as a standard Visual Studio Code snippet for all Enyo 2.7 project. Just create one under File > Preferences > User Snippet > Type Out ‘Javascript’, Edit the file to save as snippet. If you are new in creating snippet in Visual Studio Code here is a video tutorial.
Next, we move on to how to create a ViewPage. Firstly, if you are new in EnyoJS; a “Class” in enyo is called “Kind“.
A “Control” is a component that directly controls a html node, they are visible to users e.g. buttons, inputboxes.
A ViewPage is a “kind” that contains UI and “controls” when rendered. E.g. registration page, login page and etc. So in this tutorial, let’s create our first ViewPage – FirstPage.js
A typical boilerplate for ViewPage looks like below, you may create a snippet in Visual Studio Code, to auto create a boilerplate code for every ViewPage you create to hasten your development. Let’s create FirstPage.js copy the code below and place it into the src/viewpages folder.
FirstPage.js
// A typical page normally contains some visuals, a few kind components, a button or two for navigation.
var kind = require('enyo/kind');
var Button = require('enyo/button');
// We use FittableRows to auto calculate and fill the rest of the page's height.
var FittableRows = require('layout/FittableRows');

module.exports = kind({
	name: 'FirstPage',
	data: null,
	kind: FittableRows,
	// enyo-fit is a default css given by enyo framework to fill the width of the screen.
	classes: 'enyo-fit',
        // Everything in enyo is render within components: []. It is basically the html body
        // You may wrap and nest more "components" property within another one just like a normal html tag.
	components:[
		{
			// You may add your own inline css styling like this below.
			style:"background:#f2f2f2;text-align:center;height:40px;line-height:40px",
			content:"Hello World"
		},
		{
			// fit: true is used to enyo to auto fill all the remaining height of the page.
			fit:true,
			style:"background:#cccccc;text-align:center;padding:10px;",
			components:[
				{
					kind:Button,
					content:"Click Me",
					ontap:"handle_ClickMe"
				}
			]
		}
	],
	create: function(){
                //This is a standard lifecycle event when the page is first created on memory
		this.inherited(arguments);
	},
	rendered : function(){
                //This is a standard lifecycle event when the page is rendered fully.
		this.inherited(arguments);
	},
	handle_ClickMe:function(inSender,inEvent){
		console.log("This is how button events are done");
	}
});
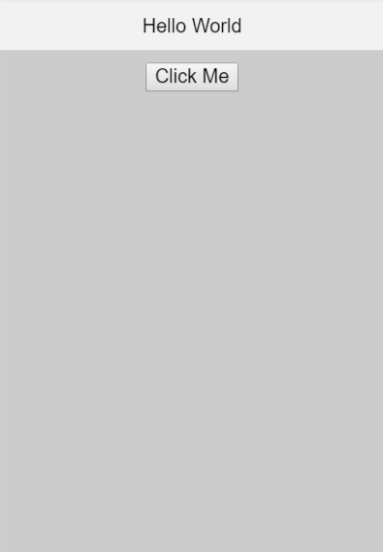
I’ve included some comments here and there to help you understand the FirstPage. To view overall what happens if index.js loads FirstPage just compile the code in terminal. Use the enyo pack command then, head towards dist folder, load the index.html to have a look. The code should look something like the picture below.
If you are still scratching your head over how components content works head towards this post.
In the next tutorial, I’ll cover a more on simple navigation within app.